
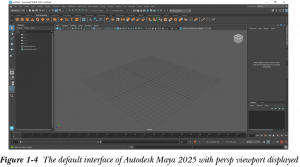
Autodesk Maya interface consists of viewports, title bar, menubar, Status Line, Shelf, Tool Box, and so on. All these components will be discussed later in this chapter. When you start Autodesk Maya 2025 for the first time, the persp viewport is displayed by default, refer to Figure 1-4.
Workspace is the part or the work area where you can create a 3D scene. Workspaces are also known as viewports or views. In this textbook, the workspaces will be referred to as viewports. Every viewport has a grid placed in the center. The grid acts as a reference that is used in aligning the 3D objects or 2D curves. A grid is a pattern of straight lines that intersect with each other to form squares. The center of the grid is intersected by two dark lines. The point of intersection of these two dark lines is known as the origin. The origin is an arbitrary point, which is used to determine the location of the objects. All the three coordinates, X, Y, and Z are set at 0 position on the origin. Note that in Maya, the X, Y, and Z axes are displayed in red, green, and blue colors, respectively.
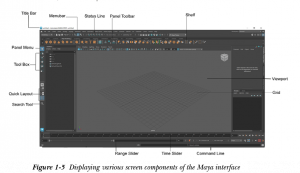
Autodesk Maya 2025 is divided into four viewports: top-Y, front-Z, side-X, and persp. These viewports are classified into two categories, orthographic, and isometric. The orthographic category comprises the top, front, and side viewports and the isometric category consists of the persp viewport. The orthographic viewport displays the 2-dimensional (2D) view of the objects created in it, whereas the isometric viewport displays the 3-dimensional (3D) view of the objects created. Every viewport can be recognized easily by its name, which is displayed at the bottom of each viewport. Figure 1-5 shows various components of the Maya interface.
Every viewport has its own Panel menu that allows you to access the tools related to that specific viewport. The Axis Direction Indicator located at the lower left corner of each viewport indicates about the X, Y, and Z axes. Similarly, every viewport in Maya has a default camera applied to it through which the viewport scene is visible. The name of the camera is displayed at the bottom of each viewport. In other words, the name of the viewport is actually the name of the camera of that particular viewport.
The title bar, which lies at the top of the screen, displays the name and version of the software, the name of the file, and the location where the file is saved. A Maya file is saved with the .mb or .ma extension. The three buttons on the extreme right of title bar are used to minimize, maximize, and close the Autodesk Maya window, respectively. Various interface components of the Autodesk Maya interface are discussed next.
Popular Maya hotkeys and shortcuts
Looking for the basics? Here are some of the most common Maya shortcuts you likely use daily:
Playback
Selecting and snapping
Display settings
Editing
Modeling
Painting
Tumble, track, or dolly
How to add or change shortcuts in Maya
Autodesk’s Maya provides plenty of built-in shortcuts, making it easy to carry out your work. That said, some artists or animators may prefer to create their own custom keyboard shortcuts to build a more personalized workflow or extend their workspace across several pieces of equipment.
You can set up your own Maya shortcuts and open up the hotkey editor using the following steps:
- Start by navigating to Windows > Settings/Preferences > Hotkey Editor.
- Select the gear icon next to the Hotkey Set field in the upper left corner and choose Duplicate.
- In the Edit Hotkeys menu, select the category for your hotkey to find the appropriate command.
- Ensure that On Press or On Release is active in the dropdown menu next to the hotkey selector.
- Once you find the command, select it and then choose the desired key on the Hotkey Editor keyboard layout.
- The adjusted key is now active. You can click the corresponding key on the Hotkey Editor to double-check you successfully assigned the command.
- Select Save to finalize your remappings.
Note that some keys are reserved for essential commands and, as a result, can’t be remapped. For instance, Ctrl + W is a critical operating system hotkey and can’t be adjusted.
How to transfer your Maya hotkeys
When working with dense animation files, switching between workspaces is common. You can transfer your Maya hotkeys using the following export process:
- Save a separate copy of your hotkeys set within the Hotkey Editor by selecting Duplicate and entering the name of your hotkeys set.
- Adjust and save your custom Maya hotkeys set.
- On your new computer or device, click Import to load your Maya hotkeys set into the Hotkey Editor.
This way, you can seamlessly transfer your custom-mapped workspace from any interface.